Build a complete GitOps pipeline on your laptop from writing your first Deployment to watching pods autoscale under load.
We work on AWS infrastructure day-to-day, and wanted a structured, hands-on reference for Kubernetes and GitOps outside of client work. This post is the result a self-contained learning project we built, written up as the tutorial we wish existed when we started. Everything here runs locally; no cloud bill required.
What We’re Building
By the end of this guide, you’ll have:
A Go microservice running in Kubernetes (minikube)
ArgoCD deploying your app via GitOps (App of Apps pattern)
GitHub Actions CI that builds, pushes, and triggers deployments automatically
HPA scaling pods up/down based on CPU load
A conceptual understanding of Karpenter for node-level autoscaling on AWS
No AWS account needed for steps 1–6. Everything runs locally on minikube.
Architecture

Two repos, two concerns:
learning-app-src: your application code, Dockerfile, CI pipeline
learning-app-gitops: Kubernetes manifests as Helm charts, ArgoCD Application definitions
Why two repos? If manifests lived alongside source code, every CI commit (updating the image tag) would trigger another CI run, creating an infinite loop. Separating them cleanly splits “build” from “deploy.”
Prerequisites
Tool & Purpose
Docker | Container runtime + image building kubectl | Kubernetes CLI minikube | Local K8s cluster Helm | Package manager (installs ArgoCD, templates charts) Git + GitHub account | Version control + CI/CD Docker Hub account | Public image registry
Docker | Container runtime + image building kubectl | Kubernetes CLI minikube | Local K8s cluster Helm | Package manager (installs ArgoCD, templates charts) Git + GitHub account | Version control + CI/CD Docker Hub account | Public image registry
Docker | Container runtime + image building kubectl | Kubernetes CLI minikube | Local K8s cluster Helm | Package manager (installs ArgoCD, templates charts) Git + GitHub account | Version control + CI/CD Docker Hub account | Public image registry
Docker | Container runtime + image building kubectl | Kubernetes CLI minikube | Local K8s cluster Helm | Package manager (installs ArgoCD, templates charts) Git + GitHub account | Version control + CI/CD Docker Hub account | Public image registry
Why minikube over kind or k3d?
Built-in addons: `minikube addons enable metrics-server` / `ingress`, one command, no manual debugging
Convenient extras: `minikube tunnel` for LoadBalancer services, built-in dashboard for visual learning
Single-binary install with sensible defaults, less time fighting the tool, more time learning Kubernetes
Step 1: Start Your Cluster
minikube startkubectl config current-context
minikube startkubectl config current-context
minikube startkubectl config current-context
minikube startkubectl config current-context
Always verify your context before applying anything. In production you might have 5 clusters configured one wrong `kubectl apply` and you’ve deployed dev code to prod.
Step 2: The Microservice
A Go HTTP service with four endpoints:
Endpoint &Purpose
GET / Pod info (hostname, version, Redis status)
GET /healthz Liveness/readiness: checks Redis connectivity
GET /metrics Prometheus format for monitoring
GET /load?duration=10s Burns CPU: triggers HPA scaling |
GET /ui/ Web dashboard with load generator button
Why Go? The final Docker image is 12MB (scratch base + static binary). Fast startup means HPA can react quickly, so you’re not waiting 30 seconds for Python containers to boot during scale-up.
Dockerfile (multi-stage)
FROM golang:1.22-alpine AS builderWORKDIR /appCOPY go.mod ./COPY main.go .COPY static/ ./static/RUN go mod tidyRUN CGO_ENABLED=0 GOOS=linux go build -ldflags="-s -w" -o /server .FROM scratchCOPY --from=builder /server /serverEXPOSE 8080ENTRYPOINT ["/server"
FROM golang:1.22-alpine AS builderWORKDIR /appCOPY go.mod ./COPY main.go .COPY static/ ./static/RUN go mod tidyRUN CGO_ENABLED=0 GOOS=linux go build -ldflags="-s -w" -o /server .FROM scratchCOPY --from=builder /server /serverEXPOSE 8080ENTRYPOINT ["/server"
FROM golang:1.22-alpine AS builderWORKDIR /appCOPY go.mod ./COPY main.go .COPY static/ ./static/RUN go mod tidyRUN CGO_ENABLED=0 GOOS=linux go build -ldflags="-s -w" -o /server .FROM scratchCOPY --from=builder /server /serverEXPOSE 8080ENTRYPOINT ["/server"
FROM golang:1.22-alpine AS builderWORKDIR /appCOPY go.mod ./COPY main.go .COPY static/ ./static/RUN go mod tidyRUN CGO_ENABLED=0 GOOS=linux go build -ldflags="-s -w" -o /server .FROM scratchCOPY --from=builder /server /serverEXPOSE 8080ENTRYPOINT ["/server"
Build and load into minikube:
docker build -t learning-app:0.1.0 .minikube image load learning-app:0.1.0
docker build -t learning-app:0.1.0 .minikube image load learning-app:0.1.0
docker build -t learning-app:0.1.0 .minikube image load learning-app:0.1.0
docker build -t learning-app:0.1.0 .minikube image load learning-app:0.1.0
Step 3: Kubernetes Manifests (By Hand First)
Before ArgoCD automates anything, deploy manually so you understand each resource.
Namespace
apiVersion: v1kind: Namespacemetadata: name: learning-app
apiVersion: v1kind: Namespacemetadata: name: learning-app
apiVersion: v1kind: Namespacemetadata: name: learning-app
apiVersion: v1kind: Namespacemetadata: name: learning-app
A logical boundary, all resources live together, easy to nuke with `kubectl delete ns learning-app`.
ConfigMap
apiVersion: v1kind: ConfigMapmetadata: name: learning-app-config namespace: learning-appdata: REDIS_ADDR: "redis:6379"
apiVersion: v1kind: ConfigMapmetadata: name: learning-app-config namespace: learning-appdata: REDIS_ADDR: "redis:6379"
apiVersion: v1kind: ConfigMapmetadata: name: learning-app-config namespace: learning-appdata: REDIS_ADDR: "redis:6379"
apiVersion: v1kind: ConfigMapmetadata: name: learning-app-config namespace: learning-appdata: REDIS_ADDR: "redis:6379"
Externalizes config from the image. Change Redis address without rebuilding or editing the Deployment.
Deployment (key concepts)
apiVersion: apps/v1kind: Deploymentmetadata: name: learning-app namespace: learning-appspec: replicas: 2 selector: matchLabels: app: learning-app template: metadata: labels: app: learning-app spec: containers: - name: learning-app image: learning-app:0.1.0 imagePullPolicy: Never ports: - containerPort: 8080 envFrom: - configMapRef: name: learning-app-config resources: requests: cpu: 100m memory: 64Mi limits: cpu: 500m memory: 128Mi livenessProbe: httpGet: path: /healthz port: 8080 readinessProbe: httpGet: path: /healthz port: 8080
apiVersion: apps/v1kind: Deploymentmetadata: name: learning-app namespace: learning-appspec: replicas: 2 selector: matchLabels: app: learning-app template: metadata: labels: app: learning-app spec: containers: - name: learning-app image: learning-app:0.1.0 imagePullPolicy: Never ports: - containerPort: 8080 envFrom: - configMapRef: name: learning-app-config resources: requests: cpu: 100m memory: 64Mi limits: cpu: 500m memory: 128Mi livenessProbe: httpGet: path: /healthz port: 8080 readinessProbe: httpGet: path: /healthz port: 8080
apiVersion: apps/v1kind: Deploymentmetadata: name: learning-app namespace: learning-appspec: replicas: 2 selector: matchLabels: app: learning-app template: metadata: labels: app: learning-app spec: containers: - name: learning-app image: learning-app:0.1.0 imagePullPolicy: Never ports: - containerPort: 8080 envFrom: - configMapRef: name: learning-app-config resources: requests: cpu: 100m memory: 64Mi limits: cpu: 500m memory: 128Mi livenessProbe: httpGet: path: /healthz port: 8080 readinessProbe: httpGet: path: /healthz port: 8080
apiVersion: apps/v1kind: Deploymentmetadata: name: learning-app namespace: learning-appspec: replicas: 2 selector: matchLabels: app: learning-app template: metadata: labels: app: learning-app spec: containers: - name: learning-app image: learning-app:0.1.0 imagePullPolicy: Never ports: - containerPort: 8080 envFrom: - configMapRef: name: learning-app-config resources: requests: cpu: 100m memory: 64Mi limits: cpu: 500m memory: 128Mi livenessProbe: httpGet: path: /healthz port: 8080 readinessProbe: httpGet: path: /healthz port: 8080
Critical fields explained:
resources.requests: what the scheduler guarantees your pod. HPA uses this as the baseline: `utilization = actual / requests × 100%`
resources.limits: the ceiling. CPU gets throttled; memory gets OOM-killed.
livenessProbe: “Is this container stuck?” → Kubernetes restarts it
readinessProbe: “Can it serve traffic?” → removed from Service endpoints if failing
imagePullPolicy: Never: for locally-loaded images in minikube
Service
apiVersion: v1kind: Servicemetadata: name: learning-app namespace: learning-appspec: selector: app: learning-app ports: - port: 80 targetPort: 8080
apiVersion: v1kind: Servicemetadata: name: learning-app namespace: learning-appspec: selector: app: learning-app ports: - port: 80 targetPort: 8080
apiVersion: v1kind: Servicemetadata: name: learning-app namespace: learning-appspec: selector: app: learning-app ports: - port: 80 targetPort: 8080
apiVersion: v1kind: Servicemetadata: name: learning-app namespace: learning-appspec: selector: app: learning-app ports: - port: 80 targetPort: 8080
Creates a stable DNS name (learning-app.learning-app.svc.cluster.local) and load-balances across pods. The selector must match your pod labels that’s how Services find their backends.
apiVersion: networking.k8s.io/v1kind: Ingressmetadata: name: learning-app namespace: learning-appspec: ingressClassName: nginx rules: - http: paths: - path: / pathType: Prefix backend: service: name: learning-app port: number: 80
apiVersion: networking.k8s.io/v1kind: Ingressmetadata: name: learning-app namespace: learning-appspec: ingressClassName: nginx rules: - http: paths: - path: / pathType: Prefix backend: service: name: learning-app port: number: 80
apiVersion: networking.k8s.io/v1kind: Ingressmetadata: name: learning-app namespace: learning-appspec: ingressClassName: nginx rules: - http: paths: - path: / pathType: Prefix backend: service: name: learning-app port: number: 80
apiVersion: networking.k8s.io/v1kind: Ingressmetadata: name: learning-app namespace: learning-appspec: ingressClassName: nginx rules: - http: paths: - path: / pathType: Prefix backend: service: name: learning-app port: number: 80
L7 HTTP routing. Requires an Ingress Controller (nginx) running in the cluster:
minikube addons enable ingress
minikube addons enable ingress
minikube addons enable ingress
minikube addons enable ingress
Deploy everything:
kubectl apply -f k8s/namespace.yamlkubectl apply -f k8s/configmap.yamlkubectl apply -f k8s/redis.yamlkubectl apply -f k8s/deployment.yamlkubectl apply -f k8s/service.yamlkubectl apply -f k8s/ingress.yaml
kubectl apply -f k8s/namespace.yamlkubectl apply -f k8s/configmap.yamlkubectl apply -f k8s/redis.yamlkubectl apply -f k8s/deployment.yamlkubectl apply -f k8s/service.yamlkubectl apply -f k8s/ingress.yaml
kubectl apply -f k8s/namespace.yamlkubectl apply -f k8s/configmap.yamlkubectl apply -f k8s/redis.yamlkubectl apply -f k8s/deployment.yamlkubectl apply -f k8s/service.yamlkubectl apply -f k8s/ingress.yaml
kubectl apply -f k8s/namespace.yamlkubectl apply -f k8s/configmap.yamlkubectl apply -f k8s/redis.yamlkubectl apply -f k8s/deployment.yamlkubectl apply -f k8s/service.yamlkubectl apply -f k8s/ingress.yaml
Step 4: GitOps with ArgoCD
Now that you understand what each manifest does, let’s automate deployment with ArgoCD.
What is GitOps?
Git is the single source of truth. You declare desired state in a repo, a controller (ArgoCD) continuously makes the cluster match.
Change a manifest in Git → ArgoCD applies it
Someone does kubectl edit manually → ArgoCD reverts it (self-healing)
Delete a resource from Git → ArgoCD deletes it from the cluster (pruning)
Install ArgoCD
kubectl create namespace argocdhelm repo add argo https://argoproj.github.io/argo-helmhelm repo updatehelm install argocd argo/argo-cd --namespace argocd --wait
kubectl create namespace argocdhelm repo add argo https://argoproj.github.io/argo-helmhelm repo updatehelm install argocd argo/argo-cd --namespace argocd --wait
kubectl create namespace argocdhelm repo add argo https://argoproj.github.io/argo-helmhelm repo updatehelm install argocd argo/argo-cd --namespace argocd --wait
kubectl create namespace argocdhelm repo add argo https://argoproj.github.io/argo-helmhelm repo updatehelm install argocd argo/argo-cd --namespace argocd --wait
Gitops Repo Structure
learning-app-gitops/├── root-app.yaml # Apply ONCE - manages everything below├── apps/│ └── learning-app.yaml
learning-app-gitops/├── root-app.yaml # Apply ONCE - manages everything below├── apps/│ └── learning-app.yaml
learning-app-gitops/├── root-app.yaml # Apply ONCE - manages everything below├── apps/│ └── learning-app.yaml
learning-app-gitops/├── root-app.yaml # Apply ONCE - manages everything below├── apps/│ └── learning-app.yaml
App of Apps Pattern
Instead of manually applying each Application, one root Application watches a directory:
root-app.yaml — the ONLY kubectl apply you ever do !!!apiVersion: argoproj.io/v1alpha1kind: Applicationmetadata: name: root-app namespace: argocdspec: project: default source: repoURL: https://github.com/mahirberkano/learning-app-gitops.git targetRevision: main path: apps destination: server: https://kubernetes.default.svc namespace: argocd syncPolicy: automated: prune: true selfHeal: true
root-app.yaml — the ONLY kubectl apply you ever do !!!apiVersion: argoproj.io/v1alpha1kind: Applicationmetadata: name: root-app namespace: argocdspec: project: default source: repoURL: https://github.com/mahirberkano/learning-app-gitops.git targetRevision: main path: apps destination: server: https://kubernetes.default.svc namespace: argocd syncPolicy: automated: prune: true selfHeal: true
root-app.yaml — the ONLY kubectl apply you ever do !!!apiVersion: argoproj.io/v1alpha1kind: Applicationmetadata: name: root-app namespace: argocdspec: project: default source: repoURL: https://github.com/mahirberkano/learning-app-gitops.git targetRevision: main path: apps destination: server: https://kubernetes.default.svc namespace: argocd syncPolicy: automated: prune: true selfHeal: true
root-app.yaml — the ONLY kubectl apply you ever do !!!apiVersion: argoproj.io/v1alpha1kind: Applicationmetadata: name: root-app namespace: argocdspec: project: default source: repoURL: https://github.com/mahirberkano/learning-app-gitops.git targetRevision: main path: apps destination: server: https://kubernetes.default.svc namespace: argocd syncPolicy: automated: prune: true selfHeal: true
Add a new microservice? Drop a YAML in `apps/`. Root app picks it up automatically.
The Application resource
apiVersion: argoproj.io/v1alpha1kind: Applicationmetadata: name: learning-app namespace: argocdspec: project: default source: repoURL: https://github.com/mahirberkano/learning-app-gitops.git targetRevision: main path: charts/learning-app helm: valueFiles: - values.yaml destination: server: https://kubernetes.default.svc namespace: learning-app syncPolicy: automated: prune: true selfHeal: true syncOptions: - CreateNamespace=true
apiVersion: argoproj.io/v1alpha1kind: Applicationmetadata: name: learning-app namespace: argocdspec: project: default source: repoURL: https://github.com/mahirberkano/learning-app-gitops.git targetRevision: main path: charts/learning-app helm: valueFiles: - values.yaml destination: server: https://kubernetes.default.svc namespace: learning-app syncPolicy: automated: prune: true selfHeal: true syncOptions: - CreateNamespace=true
apiVersion: argoproj.io/v1alpha1kind: Applicationmetadata: name: learning-app namespace: argocdspec: project: default source: repoURL: https://github.com/mahirberkano/learning-app-gitops.git targetRevision: main path: charts/learning-app helm: valueFiles: - values.yaml destination: server: https://kubernetes.default.svc namespace: learning-app syncPolicy: automated: prune: true selfHeal: true syncOptions: - CreateNamespace=true
apiVersion: argoproj.io/v1alpha1kind: Applicationmetadata: name: learning-app namespace: argocdspec: project: default source: repoURL: https://github.com/mahirberkano/learning-app-gitops.git targetRevision: main path: charts/learning-app helm: valueFiles: - values.yaml destination: server: https://kubernetes.default.svc namespace: learning-app syncPolicy: automated: prune: true selfHeal: true syncOptions: - CreateNamespace=true
Apply the root app once, then delete your hand-deployed resources; ArgoCD recreates them from Git:
kubectl delete ns learning-appkubectl apply -f root-app.yaml
kubectl delete ns learning-appkubectl apply -f root-app.yaml
kubectl delete ns learning-appkubectl apply -f root-app.yaml
kubectl delete ns learning-appkubectl apply -f root-app.yaml
Make sure `apps/learning-app.yaml` is already committed to the gitops repo before applying `root-app.yaml`. Otherwise the root app will sync successfully but find nothing to deploy.
Accessing the ArgoCD UI
Get the initial admin passwordkubectl -n argocd get secret argocd-initial-admin-secret \ -o jsonpath="{.data.password}" | base64 -d Get the initial admin passwordkubectl -n argocd get secret argocd-initial-admin-secret \ -o jsonpath="{.data.password}" | base64 -d Get the initial admin passwordkubectl -n argocd get secret argocd-initial-admin-secret \ -o jsonpath="{.data.password}" | base64 -d Get the initial admin passwordkubectl -n argocd get secret argocd-initial-admin-secret \ -o jsonpath="{.data.password}" | base64 -dOpen https://localhost:8081, log in as admin, and you’ll see the App of Apps tree.
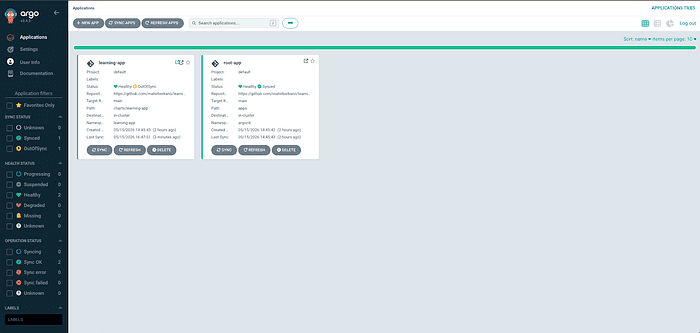
ArgoCD UI showing root-app with the learning-app as a child, both synced (green).
Test self-healing
Within seconds, ArgoCD notices the drift and restores the desired state. Git always wins.
Step 5: CI/CD Pipeline
GitHub Actions builds images and updates the gitops repo automatically.
The Flow
You push to learning-app-src
↓
GitHub Actions:
Build Docker image
Tag with git SHA (e.g., “a4f2b1c”)
Push to Docker Hub
Clone gitops repo
Update values.yaml: tag: “a4f2b1c”
Push to gitops repo
↓
ArgoCD detects change → deploys new version
Workflow file (.github/workflows/ci.yaml)
name: Build and Deployon: push: branches: [main]env: IMAGE: mahirberkano/learning-appjobs: build-and-push: runs-on: ubuntu-latest steps: - uses: actions/checkout@v4 - name: Set image tag id: tag run: echo "tag=$(git rev-parse --short HEAD)" >> "$GITHUB_OUTPUT" - name: Login to Docker Hub uses: docker/login-action@v3 with: username: ${{ secrets.DOCKERHUB_USERNAME }} password: ${{ secrets.DOCKERHUB_TOKEN }} - name: Build and push uses: docker/build-push-action@v5 with: context: . push: true tags: | ${{ env.IMAGE }}:${{ steps.tag.outputs.tag }} ${{ env.IMAGE }}:latest - name: Update gitops repo run: | git clone https://x-access-token:${{ secrets.GIT_TOKEN }}@github.com/mahirberkano/learning-app-gitops.git cd learning-app-gitops sed -i "s|tag: .*|tag: \"${{ steps.tag.outputs.tag }}\"|" charts/learning-app/values.yaml git config user.name "github-actions" git config user.email "actions@github.com" git commit -am "ci: bump image to ${{ steps.tag.outputs.tag }}" git pushname: Build and Deployon: push: branches: [main]env: IMAGE: mahirberkano/learning-appjobs: build-and-push: runs-on: ubuntu-latest steps: - uses: actions/checkout@v4 - name: Set image tag id: tag run: echo "tag=$(git rev-parse --short HEAD)" >> "$GITHUB_OUTPUT" - name: Login to Docker Hub uses: docker/login-action@v3 with: username: ${{ secrets.DOCKERHUB_USERNAME }} password: ${{ secrets.DOCKERHUB_TOKEN }} - name: Build and push uses: docker/build-push-action@v5 with: context: . push: true tags: | ${{ env.IMAGE }}:${{ steps.tag.outputs.tag }} ${{ env.IMAGE }}:latest - name: Update gitops repo run: | git clone https://x-access-token:${{ secrets.GIT_TOKEN }}@github.com/mahirberkano/learning-app-gitops.git cd learning-app-gitops sed -i "s|tag: .*|tag: \"${{ steps.tag.outputs.tag }}\"|" charts/learning-app/values.yaml git config user.name "github-actions" git config user.email "actions@github.com" git commit -am "ci: bump image to ${{ steps.tag.outputs.tag }}" git pushname: Build and Deployon: push: branches: [main]env: IMAGE: mahirberkano/learning-appjobs: build-and-push: runs-on: ubuntu-latest steps: - uses: actions/checkout@v4 - name: Set image tag id: tag run: echo "tag=$(git rev-parse --short HEAD)" >> "$GITHUB_OUTPUT" - name: Login to Docker Hub uses: docker/login-action@v3 with: username: ${{ secrets.DOCKERHUB_USERNAME }} password: ${{ secrets.DOCKERHUB_TOKEN }} - name: Build and push uses: docker/build-push-action@v5 with: context: . push: true tags: | ${{ env.IMAGE }}:${{ steps.tag.outputs.tag }} ${{ env.IMAGE }}:latest - name: Update gitops repo run: | git clone https://x-access-token:${{ secrets.GIT_TOKEN }}@github.com/mahirberkano/learning-app-gitops.git cd learning-app-gitops sed -i "s|tag: .*|tag: \"${{ steps.tag.outputs.tag }}\"|" charts/learning-app/values.yaml git config user.name "github-actions" git config user.email "actions@github.com" git commit -am "ci: bump image to ${{ steps.tag.outputs.tag }}" git pushname: Build and Deployon: push: branches: [main]env: IMAGE: mahirberkano/learning-appjobs: build-and-push: runs-on: ubuntu-latest steps: - uses: actions/checkout@v4 - name: Set image tag id: tag run: echo "tag=$(git rev-parse --short HEAD)" >> "$GITHUB_OUTPUT" - name: Login to Docker Hub uses: docker/login-action@v3 with: username: ${{ secrets.DOCKERHUB_USERNAME }} password: ${{ secrets.DOCKERHUB_TOKEN }} - name: Build and push uses: docker/build-push-action@v5 with: context: . push: true tags: | ${{ env.IMAGE }}:${{ steps.tag.outputs.tag }} ${{ env.IMAGE }}:latest - name: Update gitops repo run: | git clone https://x-access-token:${{ secrets.GIT_TOKEN }}@github.com/mahirberkano/learning-app-gitops.git cd learning-app-gitops sed -i "s|tag: .*|tag: \"${{ steps.tag.outputs.tag }}\"|" charts/learning-app/values.yaml git config user.name "github-actions" git config user.email "actions@github.com" git commit -am "ci: bump image to ${{ steps.tag.outputs.tag }}" git pushsed works for a learning project but it’s fragile, rewriting every line matching `tag:` in the file. For anything beyond a demo, use “https://github.com/mikefarah/yq” instead:
yq -i '.image.tag = "${{ steps.tag.outputs.tag }}"' charts/learning-app/values.yamlyq -i '.image.tag = "${{ steps.tag.outputs.tag }}"' charts/learning-app/values.yamlyq -i '.image.tag = "${{ steps.tag.outputs.tag }}"' charts/learning-app/values.yamlyq -i '.image.tag = "${{ steps.tag.outputs.tag }}"' charts/learning-app/values.yamlRequired secrets
Secret & Purpose
DOCKERHUB_USERNAME: Docker Hub login
DOCKERHUB_TOKEN: Docker Hub access token (read/write)
GIT_TOKEN: GitHub PAT with repo scope (push to gitops repo)
Step 6: HPA (Horizontal Pod Autoscaler)
HPA automatically scales pod count based on CPU (or memory, or custom metrics).
How it works
Every 15 seconds, HPA calculates:
desiredReplicas = ceil(currentReplicas × (currentMetric / targetMetric))
Example: 2 pods at 120% CPU, target 50%:
ceil(2 × 120/50) = ceil(4.8) = 5 pods
Prerequisites
minikube addons enable metrics-server
minikube addons enable metrics-server
minikube addons enable metrics-server
minikube addons enable metrics-server
HPA manifest
apiVersion: autoscaling/v2kind: HorizontalPodAutoscalermetadata: name: learning-app namespace: learning-appspec: scaleTargetRef: apiVersion: apps/v1 kind: Deployment name: learning-app minReplicas: 2 maxReplicas: 10 metrics: - type: Resource resource: name: cpu target: type: Utilization averageUtilization: 50 behavior: scaleDown: stabilizationWindowSeconds: 60
apiVersion: autoscaling/v2kind: HorizontalPodAutoscalermetadata: name: learning-app namespace: learning-appspec: scaleTargetRef: apiVersion: apps/v1 kind: Deployment name: learning-app minReplicas: 2 maxReplicas: 10 metrics: - type: Resource resource: name: cpu target: type: Utilization averageUtilization: 50 behavior: scaleDown: stabilizationWindowSeconds: 60
apiVersion: autoscaling/v2kind: HorizontalPodAutoscalermetadata: name: learning-app namespace: learning-appspec: scaleTargetRef: apiVersion: apps/v1 kind: Deployment name: learning-app minReplicas: 2 maxReplicas: 10 metrics: - type: Resource resource: name: cpu target: type: Utilization averageUtilization: 50 behavior: scaleDown: stabilizationWindowSeconds: 60
apiVersion: autoscaling/v2kind: HorizontalPodAutoscalermetadata: name: learning-app namespace: learning-appspec: scaleTargetRef: apiVersion: apps/v1 kind: Deployment name: learning-app minReplicas: 2 maxReplicas: 10 metrics: - type: Resource resource: name: cpu target: type: Utilization averageUtilization: 50 behavior: scaleDown: stabilizationWindowSeconds: 60
Terminal 1: port-forward the servicekubectl port-forward svc/learning-app -n learning-app 8080:80# Terminal 2: watch HPA in real timekubectl get hpa -n learning-app -w# Terminal 3: generate load (burns CPU for 30 seconds)curl "http://localhost:8080/load?duration=30s"
Terminal 1: port-forward the servicekubectl port-forward svc/learning-app -n learning-app 8080:80# Terminal 2: watch HPA in real timekubectl get hpa -n learning-app -w# Terminal 3: generate load (burns CPU for 30 seconds)curl "http://localhost:8080/load?duration=30s"
Terminal 1: port-forward the servicekubectl port-forward svc/learning-app -n learning-app 8080:80# Terminal 2: watch HPA in real timekubectl get hpa -n learning-app -w# Terminal 3: generate load (burns CPU for 30 seconds)curl "http://localhost:8080/load?duration=30s"
Terminal 1: port-forward the servicekubectl port-forward svc/learning-app -n learning-app 8080:80# Terminal 2: watch HPA in real timekubectl get hpa -n learning-app -w# Terminal 3: generate load (burns CPU for 30 seconds)curl "http://localhost:8080/load?duration=30s"
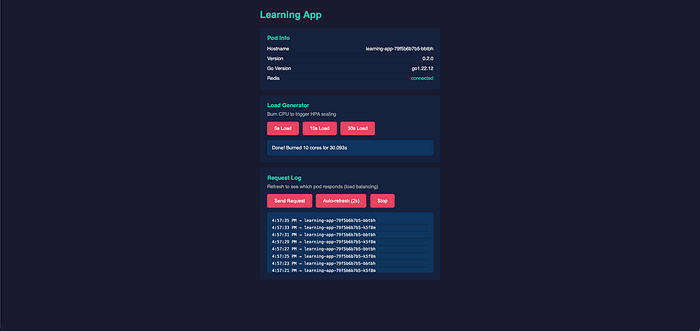
The /ui/ dashboard with the load generator button.
What you’ll observe:
CPU % climbs above 50%
HPA scales replicas up (toward max 10)
Load finishes → CPU drops
After 60 seconds of low usage → scales back to 2
Why resource requests matter
HPA calculates utilization as actual_cpu / requests.cpu. Without requests defined, HPA can’t compute a percentage and won’t scale. This is the most common HPA “it’s not working” issue.
Karpenter: Node-Level Autoscaling (AWS EKS)
Note: Karpenter requires an AWS EKS cluster. It cannot run on minikube. This section is conceptual.
The Problem HPA Can’t Solve
HPA adds pods, but what if there are no nodes with enough capacity to schedule them? The new pods stay Pending. You need something to add nodes.
What Karpenter Does
Karpenter is an AWS-native node autoscaler that provisions right-sized EC2 instances when pods can’t be scheduled.
Pod unschedulable (no node capacity) ↓Karpenter reads pod requirements (CPU, memory, GPU, topology) ↓Calls EC2 CreateFleet API → provisions optimal instance ↓Node registers → pod gets scheduled
Pod unschedulable (no node capacity) ↓Karpenter reads pod requirements (CPU, memory, GPU, topology) ↓Calls EC2 CreateFleet API → provisions optimal instance ↓Node registers → pod gets scheduled
Pod unschedulable (no node capacity) ↓Karpenter reads pod requirements (CPU, memory, GPU, topology) ↓Calls EC2 CreateFleet API → provisions optimal instance ↓Node registers → pod gets scheduled
Pod unschedulable (no node capacity) ↓Karpenter reads pod requirements (CPU, memory, GPU, topology) ↓Calls EC2 CreateFleet API → provisions optimal instance ↓Node registers → pod gets scheduled
Karpenter vs Cluster Autoscaler
How it works Scales existing node groups (ASGs). Provisions individual instances directly
Instance selection: Limited to what’s in the node group. Picks from entire EC2 catalog dynamically
Speed: Minutes (ASG scaling). Seconds (direct EC2 API).
Right-sizing: One size fits all in a node group. Picks exact instance for the workload.
Consolidation: None Actively moves pods to fewer nodes
Spot: Mixed-instance ASG policies. Native interruption handling + automatic fleet diversification.
Key Concepts
NodePool: defines constraints for provisioned nodes:
apiVersion: karpenter.sh/v1kind: NodePoolspec: template: spec: requirements: - key: karpenter.sh/capacity-type operator: In values: ["on-demand", "spot"] - key: node.kubernetes.io/instance-type operator: In values: ["m5.large", "m5.xlarge", "c5.large", "c5.xlarge"] disruption: consolidationPolicy: WhenEmptyOrUnderutilized
apiVersion: karpenter.sh/v1kind: NodePoolspec: template: spec: requirements: - key: karpenter.sh/capacity-type operator: In values: ["on-demand", "spot"] - key: node.kubernetes.io/instance-type operator: In values: ["m5.large", "m5.xlarge", "c5.large", "c5.xlarge"] disruption: consolidationPolicy: WhenEmptyOrUnderutilized
apiVersion: karpenter.sh/v1kind: NodePoolspec: template: spec: requirements: - key: karpenter.sh/capacity-type operator: In values: ["on-demand", "spot"] - key: node.kubernetes.io/instance-type operator: In values: ["m5.large", "m5.xlarge", "c5.large", "c5.xlarge"] disruption: consolidationPolicy: WhenEmptyOrUnderutilized
apiVersion: karpenter.sh/v1kind: NodePoolspec: template: spec: requirements: - key: karpenter.sh/capacity-type operator: In values: ["on-demand", "spot"] - key: node.kubernetes.io/instance-type operator: In values: ["m5.large", "m5.xlarge", "c5.large", "c5.xlarge"] disruption: consolidationPolicy: WhenEmptyOrUnderutilized
EC2NodeClass: AWS-specific configuration:
apiVersion: karpenter.k8s.aws/v1kind: EC2NodeClassspec: amiSelectorTerms: - alias: al2023@latest subnetSelectorTerms: - tags: karpenter.sh/discovery: my-cluster securityGroupSelectorTerms: - tags: karpenter.sh/discovery: my-cluster
apiVersion: karpenter.k8s.aws/v1kind: EC2NodeClassspec: amiSelectorTerms: - alias: al2023@latest subnetSelectorTerms: - tags: karpenter.sh/discovery: my-cluster securityGroupSelectorTerms: - tags: karpenter.sh/discovery: my-cluster
apiVersion: karpenter.k8s.aws/v1kind: EC2NodeClassspec: amiSelectorTerms: - alias: al2023@latest subnetSelectorTerms: - tags: karpenter.sh/discovery: my-cluster securityGroupSelectorTerms: - tags: karpenter.sh/discovery: my-cluster
apiVersion: karpenter.k8s.aws/v1kind: EC2NodeClassspec: amiSelectorTerms: - alias: al2023@latest subnetSelectorTerms: - tags: karpenter.sh/discovery: my-cluster securityGroupSelectorTerms: - tags: karpenter.sh/discovery: my-cluster
Consolidation: Karpenter continuously evaluates:
Can this expensive on-demand node be replaced with a cheaper spot instance?
Can pods on an underutilized node fit elsewhere so we terminate it?
Are there empty nodes we can remove?
This runs continuously, saving significant cloud costs without manual intervention.
When to Use Karpenter vs Cluster Autoscaler
Use Karpenter if you’re on EKS and want fast, cost-efficient, intelligent scaling
Use Cluster Autoscaler if you’re on GKE/AKS or need simpler node group management
Use neither if your workload is stable and you can pre-provision nodes
The Full Scaling Picture
Traffic increases ↓HPA: "CPU is high, I need more pods" ↓HPA creates new pods → some are Pending (no capacity) ↓Karpenter: "Pods need 2 CPU + 4GB, let me find the cheapest instance" ↓Provisions c5.large spot instance in 30 seconds ↓Pods scheduled → traffic served ↓Traffic decreases ↓HPA scales down pods → node becomes underutilized ↓Karpenter consolidation: "This node is 20% used, moving pods elsewhere" ↓Node terminated → cost saved
Traffic increases ↓HPA: "CPU is high, I need more pods" ↓HPA creates new pods → some are Pending (no capacity) ↓Karpenter: "Pods need 2 CPU + 4GB, let me find the cheapest instance" ↓Provisions c5.large spot instance in 30 seconds ↓Pods scheduled → traffic served ↓Traffic decreases ↓HPA scales down pods → node becomes underutilized ↓Karpenter consolidation: "This node is 20% used, moving pods elsewhere" ↓Node terminated → cost saved
Traffic increases ↓HPA: "CPU is high, I need more pods" ↓HPA creates new pods → some are Pending (no capacity) ↓Karpenter: "Pods need 2 CPU + 4GB, let me find the cheapest instance" ↓Provisions c5.large spot instance in 30 seconds ↓Pods scheduled → traffic served ↓Traffic decreases ↓HPA scales down pods → node becomes underutilized ↓Karpenter consolidation: "This node is 20% used, moving pods elsewhere" ↓Node terminated → cost saved
Traffic increases ↓HPA: "CPU is high, I need more pods" ↓HPA creates new pods → some are Pending (no capacity) ↓Karpenter: "Pods need 2 CPU + 4GB, let me find the cheapest instance" ↓Provisions c5.large spot instance in 30 seconds ↓Pods scheduled → traffic served ↓Traffic decreases ↓HPA scales down pods → node becomes underutilized ↓Karpenter consolidation: "This node is 20% used, moving pods elsewhere" ↓Node terminated → cost saved
The Path Forward (When You Have an AWS Account)
If you want to take this learning project to EKS and try Karpenter for real, the rough steps are:
 1. Create a small EKS cluster (use eksctl for the quickest path)eksctl create cluster --name karpenter-demo \  --region eu-central-1 \  --node-type t3.medium \  --nodes 2
 2. Install Karpenter via Helmhelm upgrade --install karpenter oci://public.ecr.aws/karpenter/karpenter \  --version "1.0.0" \  --namespace kube-system \  --create-namespace \  --set "settings.clusterName=karpenter-demo" \  --wait
 3. Apply your NodePool and EC2NodeClass (the YAMLs shown above)kubectl apply -f nodepool.yamlkubectl apply -f ec2nodeclass.yaml
 4. Point the same ArgoCD setup at this cluster
 5. Hammer the /load endpoint hard enough that HPA exhausts node capacity
 6. Watch Karpenter spin up new EC2 instances in real time
 1. Create a small EKS cluster (use eksctl for the quickest path)eksctl create cluster --name karpenter-demo \  --region eu-central-1 \  --node-type t3.medium \  --nodes 2
 2. Install Karpenter via Helmhelm upgrade --install karpenter oci://public.ecr.aws/karpenter/karpenter \  --version "1.0.0" \  --namespace kube-system \  --create-namespace \  --set "settings.clusterName=karpenter-demo" \  --wait
 3. Apply your NodePool and EC2NodeClass (the YAMLs shown above)kubectl apply -f nodepool.yamlkubectl apply -f ec2nodeclass.yaml
 4. Point the same ArgoCD setup at this cluster
 5. Hammer the /load endpoint hard enough that HPA exhausts node capacity
 6. Watch Karpenter spin up new EC2 instances in real time
 1. Create a small EKS cluster (use eksctl for the quickest path)eksctl create cluster --name karpenter-demo \  --region eu-central-1 \  --node-type t3.medium \  --nodes 2
 2. Install Karpenter via Helmhelm upgrade --install karpenter oci://public.ecr.aws/karpenter/karpenter \  --version "1.0.0" \  --namespace kube-system \  --create-namespace \  --set "settings.clusterName=karpenter-demo" \  --wait
 3. Apply your NodePool and EC2NodeClass (the YAMLs shown above)kubectl apply -f nodepool.yamlkubectl apply -f ec2nodeclass.yaml
 4. Point the same ArgoCD setup at this cluster
 5. Hammer the /load endpoint hard enough that HPA exhausts node capacity
 6. Watch Karpenter spin up new EC2 instances in real time
 1. Create a small EKS cluster (use eksctl for the quickest path)eksctl create cluster --name karpenter-demo \  --region eu-central-1 \  --node-type t3.medium \  --nodes 2
 2. Install Karpenter via Helmhelm upgrade --install karpenter oci://public.ecr.aws/karpenter/karpenter \  --version "1.0.0" \  --namespace kube-system \  --create-namespace \  --set "settings.clusterName=karpenter-demo" \  --wait
 3. Apply your NodePool and EC2NodeClass (the YAMLs shown above)kubectl apply -f nodepool.yamlkubectl apply -f ec2nodeclass.yaml
 4. Point the same ArgoCD setup at this cluster
 5. Hammer the /load endpoint hard enough that HPA exhausts node capacity
 6. Watch Karpenter spin up new EC2 instances in real time
The IAM setup (Karpenter Controller role, Node IAM role, instance profile, SQS interruption queue) is the only fiddly part: follow the official Karpenter getting-started guide which gives you the CloudFormation template that creates everything in one shot.
Cost warning: a t3.medium EKS cluster runs ~$0.10/hour for the control plane + ~$0.04/hour per node. If you tear down the cluster the same day you create it, the whole experiment costs less than a coffee. Just don’t forget the `eksctl delete cluster` at the end.
Key Takeaways
Separation of concerns: source code and infrastructure live in separate repos
Git is the source of truth: the cluster always matches what’s in Git
Self-healing: manual changes are overwritten, forcing everyone through Git
Declarative > imperative: you declare desired state, controllers make it happen
Resource requests matter: HPA and Karpenter both need accurate resource declarations
Immutable deploys: new code = new image tag = new rollout. Never mutate running containers
Scale at two levels: HPA scales pods (horizontal), Karpenter scales nodes (infrastructure)
Repos
Learning app source
Helm charts + ArgoCD applications
Built on minikube, deployed with ArgoCD, scaled with HPA. The concepts transfer directly to production EKS/GKE clusters the tools are the same, just the infrastructure gets bigger.
Check out our medium page: Clerion Medium